Design the banner of your blog with Google Font Effects very easily by using HTML/CSS.
Are you having a problem with creating a banner for your website?
Then don't worry, this blog will solve your problem by saving a lot of time and effort in creating the banner.
The current blog is basically for them those who are having a problem in creating their banner or those who don't know how they can create banners.
I know what usually happens to you is when you want to create a banner for your website you search on Google, and you land up on a website or a web application that allows you to create your banner online, only when you are signed up. And what the fact is, you create your banner with so much effort involving your heart and soul, but hear is the climax when you try to download the banner they end up charging you.
I know there might be a possibility that there are few online platforms that allow you to create a banner for free, but they are so challenging to be found. And this makes you so frustrated (So am I), finally Google has launched a beta version of Google Font Effects, which can be used as a banner and which may contain some animations also.
So let's get started!
How to use Google Font Effects:-
If you don't know how to use Google Font in your blog via HTML/CSS, visit the given link.
Before going ahead in this blog, I want to tell you that Google Font Effects is now available in the Beta version that means it is in the testing period but a useful tool to use.
After applying a Google Font of your choice now, you have to choose a Google Font Effect to implement the desired effect on your font.
We have used the following Syntax before to apply Google Font.
<link href="https://fonts.googleapis.com/css?family=Font+Name
And that was the example tag applied in the head tag section.
<link href="https://fonts.googleapis.com/css?family=Roboto+Condensed" rel="stylesheet"></link>
Know we have to follow the given Syntax.
<link href="https://fonts.googleapis.com/css?family=Font+Name&effect=API+Name" rel="stylesheet"></link>
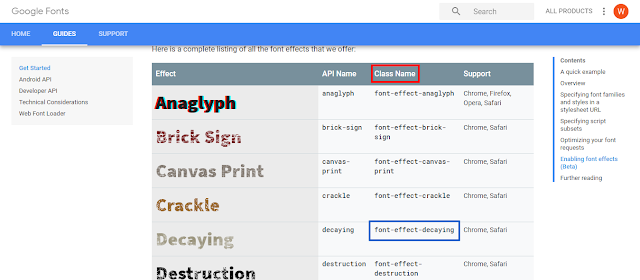
In this tag, only we have to add the following API name, which you have selected.
<link href="https://fonts.googleapis.com/css?family=Roboto+Condensed&effect=decaying" rel="stylesheet"></link>Now add the Class Name, as shown in the Syntax.
<div class="font-effect-Class+Name">This is the syntax of font effect!<div>
Class Name will be the same as the API name, but we have to add the prefix (font-effect-).
<div class="font-effect-decaying">This is the example of font effect!<div>
Note:-
If you want to use more than one effect, you can do it by separating the API Name with a pipe character (|).
Syntax:-
https://fonts.googleapis.com/css?family=Font+Name&effect=API+Name|API+Name
E.g.:-
https://fonts.googleapis.com/css?family=Rancho&effect=decaying|3d-float
And use the Class Name as same as we do for Multiple classes.
ThankYou!


0 Comments